


by Pete Rentz and William (Bill) Van Horn
Flashback- Chain Saw Pack: One of those nice-and-easy do-it-yourself projects!
***This article was originally penned by Pete Rentz and published in the April 1996 issue of The REGISTER.***
Did you ever wish that you could carry your chain saw safely on your back instead of at the end of your aching fingers? Here’s a pack that I have found useful for carrying chain saw, wrench, chaps, wedges, gas, bar oil, etc., for miles on the Trail. In addition, this rig keeps everything together so that you don’t get started on your job only to find that you’ve forgotten something. (The pack is not big enough for a logging helmet; you must carry that on your head.)
Basically, it’s a “freighter” pack with the bottom part of a 5-gallon gasoline can strapped to it. The saw is held vertically by a standard plastic scabbard, which is bolted or riveted to the can. This way, the saw can be removed without disturbing anything in the pack, and the weight of the power head is balanced high on the pack for easy carrying.
The pack frame is military surplus, although any sturdy frame with a bottom shelf could be adapted to this purpose. The can is a standard steel “Jerry can” with the top part cut off using a hacksaw. After smoothing the rough edge with file and sandpaper, repaint the can to match your saw or protective helmet.
Now comes the tricky part. You can’t use just any bolts to attach the scabbard to the inside of the can. The bolts must have a flat head to avoid catching on the saw teeth and dulling them. Two bolts at the top and one at the bottom are probably sufficient, as illustrated. “Pop” rivets could also be used by drilling an access hole in the face of the scabbard for the rivet tool. Use the 3/16” rivets with a ⅜” access hole. Don’t use the smaller rivets; they’re not strong enough. Run the scabbard all the way to the bottom of the can for extra strength. The holes in the scabbard and the can must be very carefully aligned and drilled. I would recommend use of a template to avoid frustration during assembly.
A quart can of fuel-oil mix and a pint plastic bottle of bar oil are probably sufficient for most Trail projects. A file doesn’t weigh much and can be a lifesaver if you accidentally hit a rock.
2017 Update: “This pack basically prepares you for a day in the field, and all you need to do is to grab it when you leave the house. It is a little heavy, and if I were writing the article again, I would recommend something lighter than a sawed-off jerry can. I have subsequently built lighter models using a 5 gallon plastic bucket sawed in half with the scabbard worked into a wooden baffle enclosing the open side of the bucket. Construction of this requires some woodworking skills.” -Pete Rentz
Editor’s Note 2017: On an outing with Nantahala Hiking Club this past year I took note of Bill Van Horn’s chain saw pack. It seemed to have room for everything and appeared very manageable to carry the saw while hiking. As an addition to this Flashback Friday post Bill offered up insight into how he created his personal chain saw pack. -Natrieifia Miller
Chain Saw Pack
By Bill Van Horn Nantahala Hiking Club
The chain saw pack I constructed and carry is based on a design by fellow NHC member John Newman who was the club’s primary sawyer when I joined the maintenance crew in 2002.
The intent of the design is to have a pack that keeps the weight (center of gravity) as low as possible. Its 3 major components are an external frame pack (ALPS), a rectangular hard plastic bucket, and cloth pouches to carry required gear. The cloth pouches I found were back pack add on accessory bags. I use two by Granite Gear at the top of the external fr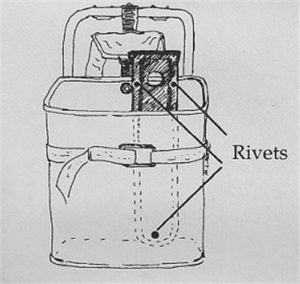 ame and two by Patagonia mounted to the bottom of the external frame.
To carry water I had an old Camel Back water bladder insulated cover made of heavy duty nylon. I have become accustomed to the convenience of being able to drinking from a tube as opposed to a water bottle. The water bladder (2 liter) has the ability  to be attached with one strap to the external frame between the two Granite Gear pouches. The heavy duty nylon cover protects it from punctures, abrasions and chain saw heat.
I cut a hole in the bottom of the rectangular bucket to allow about 3 inches of the chain saw handle to protrude.
This lowers the center of gravity and helps stabilize the saw from shifting as I hike. I drilled holes in the bucket and used parachute cord to attach it to the external frame. The saw (Stile 025 with a 16 inch bar) is carried with a scabbard which is tied onto the saw break handle by parachute cord. Once the saw is placed in the bucked saw chaps are folded and placed between the scabbard and the water bladder. I use a bungee to compress the scabbard against the external frame to hold the chaps in place and prevent the saw from shifting as I hike. The saw helmet is slipped over the scabbard. The helmet’s own weight keeps it in place. In cooler weather I usually wear the chaps while I am hiking with the middle (behind the knee) buckles unbuckled.
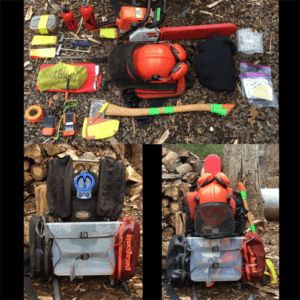
The saw with scabbard and filled with fuel and oil weighs about 15 pounds. The full pack with chain saw, equipment, water, personal gear and food for a typical maintenance day weighs 39 pounds. Photo one is the chain saw pack empty but with 2 liter bladder attached. The top photo to the right is chain saw pack with all gear carried displayed.
Chain saw equipment:
Fuel 22oz
Bar oil 11oz
Plastic wedges 2
Chain saw tools
Round file
Flat file
File guide
Spark plug
Spare chain
Spare pull rope
Spare bar nut
Tape measure
Flagging tape
 Personal gear:
Water 2 liters
Food (lunch)
Extra clothing (rain jacket)
Ground cloth
10 Essentials in a bag (compass, head lamp with extra batteries, matches, fire starter, whistle, knife, personal first aid kit, duct tape and toilet paper)
Reference materials (club information, project checklists, chainsaw reference material, sawyer certification card, etc.)
Cell phone/camera
Radio: EMS and USFS channels
Radio: internal club channel
Axe with cover carried
The bottom left photo is chain saw pack empty and bottom right photo is the pack filled with gear.